

网络就像一个巨大的、强大的数据库,每天都有大量的数据产生。随着大数据和数据科学等趋势的兴起,数据变得比以往更加有用,被用来训练机器学习算法,产生洞察力,预测未来,以及其他许多目的。
手动逐页提取这些数据可能是一个非常缓慢和耗时的过程。网页爬取的过程可以是一个有用的解决方案,以编程方式从网络上提取数据。由于浏览器的自动化,它模拟了人类的动作,如点击和滚动网络系统,用户可以简单有效地收集有用的数据,而不会受到手工过程的阻碍。
在Python中,有许多用于网页爬取的工具和库。一些最流行的选择包括request、BeautifulSoup、Scrapy、MechanicalSoup、lxml和selenium。在这篇文章中,你将了解另一个强大的选择,Pyppeteer,并探索如何作为一个Python开发者开始使用它。
什么是Pyppeteer?
Pyppeteer是JavaScript(Node)库Puppeteer的一个Python包装器。它的工作原理与Selenium类似,支持无头和无头模式,不过Pyppeteer的本地支持仅限于JavaScript和Chromium浏览器。
无头模式只是指在没有图形用户界面(GUI)的背景下运行网络浏览器。这通常适用于网络自动化、自动测试和网络刮擦等任务,因为它大大减少了浏览器的加载时间和所需的计算能力,因为所有的工作都在后台完成。
为什么是Pyppeteer?
虽然像request和BeautifulSoup这样的工具擅长从静态网站中提取数据,但当涉及到动态或反应式网站时,它们就会陷入困境,因为这些网站的用户界面上涉及到大量的JS,如ReactJS、AngularJS或VueJS的框架。他们根本不是为了处理动态创建的内容而制造的。
另一方面,Pyppeteer给你控制整个浏览器及其元素的能力,而不是使用HTTP库,如request来获取页面的内容。这给了你更多的灵活性,你可以完成什么。Pyppeteer的一些具体用例包括。
- 创建网站页面的屏幕截图或PDF文件
- 键盘输入、表单提交、UI测试等的自动化
- 抓取一个单页应用程序,以产生预渲染的内容(即服务器端渲染)。
- 生成一个自动化测试环境,在完全更新的Chrome和JavaScript版本中运行测试
实现Pyppeteer
现在你对Pyppeteer有了一些了解,让我们开始学习如何在Python中实现它的教程。
设置你的虚拟环境
首先,最好的做法是为你创建一个独立的开发环境,这样你就不会弄乱任何现有的库:
# Install virtualenv (If you don't have one)

## installing | Window
pip install --upgrade virtualenv

## installing | Linux | Mac
pip3 install --upgrade virtualenv

# create virtual environment | Window | Linux | Mac
virtualenv pyp-env

# activating pyp-env | Window
pyp-env\Scripts\activate

# activating pyp-env | Linux | Mac
source pyp-env/bin/activate
安装
Pyppeteer是需要安装的主要依赖项。注意,它要求你运行Python 3.6以上,你可以直接使用pip或从Pyppeteer GitHub仓库安装。
# Installing using pip | Window
C:\> python -m pip install pyppeteer

# Installing using pip | Linux | Mac
$ python3 -m pip install pyppeteer

# Installing from a GitHub repository | Window
C:\> python -m pip install -U git+https://github.com/miyakogi/pyppeteer.git@dev

# Installing from a GitHub repository | Linux | Mac
$ python3 -m pip install -U git+https://github.com/miyakogi/pyppeteer.git@dev
请注意:
1. 当你第一次运行你的脚本时,Pyppeteer可能会延迟一段时间,因为它需要一些时间来下载Chromium浏览器的最新版本。另外,你也可以在运行你的脚本之前用以下命令手动完成安装:
$ pyppeteer-install
2. M1苹果机在arm64模式下运行Pyppeteer可能有问题,可能需要通过Rosetta运行。
值得一提的是,Pyppeteer默认有异步支持,这意味着它允许你的脚本/应用程序异步处理浏览器自动化和刮擦过程。当涉及到HTTP调用的任务时,这可能是一个性能提升器。
用Pyppeteer抓取截图
接下来,你将学习如何使用Pyppeteer从网站上捕捉屏幕截图,并将其保存为图片。
首先,导入你所需要的库:
import asyncio
from pyppeteer import launch
然后创建一个异步函数来打开一个网站,并捕获一个屏幕截图:
import asyncio
from pyppeteer import launch

async def main():
    # launch chromium browser in the background
    browser = await launch()
    # open a new tab in the browser
    page = await browser.newPage()
    # add URL to a new page and then open it
    await page.goto("https://www.python.org/")
    # create a screenshot of the page and save it
    await page.screenshot({"path": "python.png"})
    # close the browser
    await browser.close()

print("Starting...")
asyncio.get_event_loop().run_until_complete(main())
print("Screenshot has been taken")
最后,运行你的脚本(app.py):
# Window
C:\> python app.py
......
Starting...
Screenshot has been taken

# Linux | Mac
$ python3 app.py
......
Starting...
Screenshot has been taken
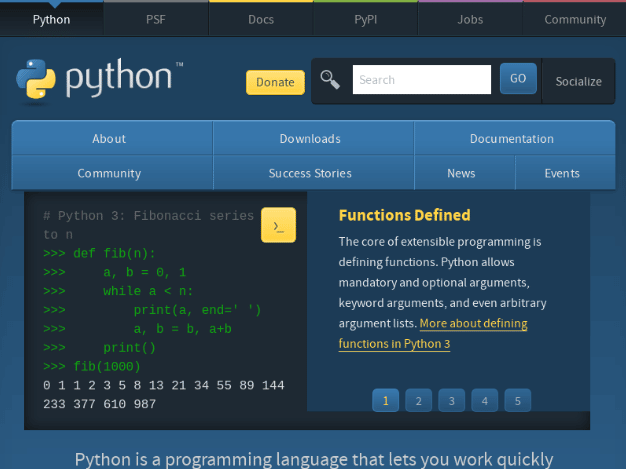
当你看到 “屏幕截图已被拍摄 “时,你应该能够在你的当前目录中看到一个名为 “python.png “的新图像。它看起来应该是这样的:
这是一个非常基本的使用Pyppeteer进行屏幕截图的例子。然而,如前所述,Pyppeteer也适合用于更复杂的动态网站。在下一节中,你将探索第二个例子,你将学习如何建立一个简单的网络刮擦脚本,从一个交互式网站中提取主题标题。这是Pyppeteer的闪光点,因为这几乎是不可能用其他工具如request或BeautifulSoup完成的。
用Pyppeteer抓取复杂的页面内容
假设你的任务是为Educative.io/edpresso的给定主题名称列表爬取文章创意。页面的内容会根据你在搜索框中输入的内容进行交互式渲染。
检查这个GIF,你可以快速地头脑风暴,脚本需要采取的步骤,以便能够有效地提取互动文章的想法。这些步骤可能包括。
- 找到搜索框
- 在搜索框上写下一个目标主题
- 等待主题加载
- 提取关于该主题的所有文章标题
- 从搜索框中删除主题
- 重复步骤2-5,直到你迭代完所有必要的主题
设置
在进行算法的实现之前,请记住,Pyppeteer默认是以无头模式启动Chromium浏览器。当涉及到构建一个有很多不可预测性的脚本时,通常最好是手动配置成以非无头模式运行,因为这往往会减轻盲目调试的负担。
下面是如何配置Pyppeteer在非无头模式下运行:
# launch browser in non-headless mode
browser = await launch({"headless": False})

# It's also good choice to allow full screen
# To enable full screen on the launched browser
# Here how you do that
browser = await launch({"headless": False, "args": ["--start-maximized"]})
现在我们再来设置一下脚本的各个环节。
1.找到搜索框
打开网站的第一行代码将类似于本文第一个例子中使用的代码。不过在这里,你需要添加一个新的行,用一个CSS选择器来定位搜索框。你的代码将看起来像这样:
import asyncio
from typing import List
from pyppeteer import launch

async def get_article_titles(keywords: List[str]):
    # launch browser in headless mode
    browser = await launch({"headless": False, "args": ["--start-maximized"]})
    # create a new page
    page = await browser.newPage()
    # set page viewport to the largest size
    await page.setViewport({"width": 1600, "height": 900})
    # navigate to the page
    await page.goto("https://www.educative.io/edpresso")
    # locate the search box
    entry_box = await page.querySelector(
       "#__next > div.ed-grid > div.ed-grid-main > div > div.flex.flex-row.items-center.justify-around.bg-gray-50.dark\:bg-dark.lg\:py-0.lg\:px-6 > div > div.w-full.p-0.m-0.flex.flex-col.lg\:w-1\/2.lg\:py-0.lg\:px-5 > div.pt-6.px-4.pb-0.lg\:sticky.lg\:p-0 > div > div > div.w-full.dark\:bg-dark.h-12.flex-auto.text-sm.font-normal.rounded-sm.cursor-text.inline-flex.items-center.hover\:bg-alphas-black06.dark\:hover\:bg-gray-A900.border.border-solid.overflow-hidden.focus-within\:ring-1.border-gray-400.dark\:border-gray-900.focus-within\:border-primary.dark\:focus-within\:border-primary-light.focus-within\:ring-primary.dark\:focus-within\:ring-primary-light > input"
   )
2.撰写目标主题
# Type keyword in search box
await entry_box.type(keyword)
3.等待主题加载
# wait for search results to load
await page.waitFor(4000)
4.提取文章的想法
# extract the article titles
topics = await page.querySelectorAll("h2")
for topic in topics:
    title = await topic.getProperty("textContent")
    # print the article titles
    print(await title.jsonValue())
5.从搜索框中删除主题
# clear the input box
for _ in range(len(keyword)):
    await page.keyboard.press("Backspace")
6.重复步骤2-5(对主题进行迭代)
for keyword in keywords:
    # type keyword in search box
    await entry_box.type(keyword)
    # wait for search results to load
    await page.waitFor(4000)
    # extract the article titles
    topics = await page.querySelectorAll("h2")

    # print the article titles
    for topic in topics:
        title = await topic.getProperty("textContent")
        print(await title.jsonValue())

    # clear the input box
    for _ in range(len(keyword)):
        await page.keyboard.press("Backspace")
完成脚本
现在你已经建立了算法的各个部分,现在是时候把整个脚本放在一起了。你的完整源代码应该是这样的:
import asyncio
from typing import List
from pyppeteer import launch

async def get_article_titles(keywords: List[str]):
   # launch browser in headless mode
   browser = await launch({"headless": False, "args": ["--start-maximized"]})
   # create a new page
   page = await browser.newPage()
   # set page viewport to the largest size
   await page.setViewport({"width": 1600, "height": 900})
   # navigate to the page
   await page.goto("https://www.educative.io/edpresso")
   # locate the search box
   entry_box = await page.querySelector(
       "#__next > div.ed-grid > div.ed-grid-main > div > div.flex.flex-row.items-center.justify-around.bg-gray-50.dark\:bg-dark.lg\:py-0.lg\:px-6 > div > div.w-full.p-0.m-0.flex.flex-col.lg\:w-1\/2.lg\:py-0.lg\:px-5 > div.pt-6.px-4.pb-0.lg\:sticky.lg\:p-0 > div > div > div.w-full.dark\:bg-dark.h-12.flex-auto.text-sm.font-normal.rounded-sm.cursor-text.inline-flex.items-center.hover\:bg-alphas-black06.dark\:hover\:bg-gray-A900.border.border-solid.overflow-hidden.focus-within\:ring-1.border-gray-400.dark\:border-gray-900.focus-within\:border-primary.dark\:focus-within\:border-primary-light.focus-within\:ring-primary.dark\:focus-within\:ring-primary-light > input"
   )

   for keyword in keywords:
       print("====================== {} ======================".format(keyword))
       # type keyword in search box
       await entry_box.type(keyword)
       # wait for search results to load
       await page.waitFor(4000)
       # extract the article titles
       topics = await page.querySelectorAll("h2")
       for topic in topics:
           title = await topic.getProperty("textContent")
           # print the article titles
           print(await title.jsonValue())

       # clear the input box
       for _ in range(len(keyword)):
           await page.keyboard.press("Backspace")

print("Starting...")
asyncio.get_event_loop().run_until_complete(
   get_article_titles(["python", "opensource", "opencv"])
)
print("Finished extracting articles titles")
运行脚本
一旦你的脚本被编译完成,就可以看看它是否工作了。像你通常运行Python脚本那样启动该脚本,如图所示:
$ python3 app.py

Starting...
====================== python ======================
What is the contextlib module?
What is the difference between String find() and index() method?
Installing pip3 in Ubuntu
What is a private heap space?
......
====================== opensource ======================
Knative
How to use ASP.NET Core
What is apache Hadoop?
What is OpenJDK?
What is Azure Data Studio?
.....
====================== opencv ======================
What is OpenCV in Python?
Eye Blink detection using OpenCV, Python, and Dlib
How to capture a frame from real-time camera video using OpenCV
Finished extracting articles titles

[文中代码源自Scrapingbee]
当你运行你的脚本时,它会自动启动Chromium浏览器,然后为Educative.io页面打开一个新标签。然后,它将通过上面强调的所有步骤,打印出每个关键词的爬取文章标题。如果你在运行你的脚本时看到与上述输出类似的结果,那么恭喜你,你成功了
总 结
在这篇文章中,你了解了网页爬取,并探索了Pyppeteer构建脚本的能力,可以做任何事情,从捕捉简单的网站屏幕截图到网络爬取动态、互动的网页。然而,这些只是基础知识。现在你已经知道了基础知识,请花些时间通过访问Pyppeteer的官方文档,在你自己的好奇心下探索其余的内容。